BUILD A DUMMY
NARROW-WIDTH KEYBOARD

In the image above, the top keyboard has an octave width of 6-inches, and the bottom keyboard is 5.5-inches. Instructions are provided below for building both keyboards.
I wanted to build a dummy keyboard primarily so that I could get an idea of the feel of narrow keys, whilst saving up to purchase a real narrow-key piano. Of course you can use a dummy keyboard to test your hand span for different octave sizes, but you can also try silently 'playing' familiar passages of music. This, in turn, helps you to make an informed decision on whether or not you feel you would benefit from a narrow-key instrument, and if so, which size would be the best fit.
The instructions below are for (nearly) 2-octave keyboards, but you could easily alter this. This is a good size as it allows you to try out a lot of different passages for one hand. Yes, you have to use your imagination as the keys don't actually press down, and yes it doesn't make a sound, but I have found a couple of ways around this. You can play a recording of the piece as you silently 'play' along. You can try singing along to the main melodic parts as you play, or simply imagine the music in your head. This is actually a great way to develop your inner ear!
A dummy keyboard is also a great tool for spreading the word about narrow-key pianos. Most pianists have never heard of the idea of a piano with a different key width to the standard size, let alone had the opportunity to try one out! Change can only happen if more people are aware of the benefits of using these keyboards. It is much easier to appreciate the advantages of a narrow keyboard if you can actually get your hands on a 3-dimensional model. If you don't fancy building one yourself, there are also 3-D printed models available (at the time of writing) via a seller on etsy. To me, the plastic models do not look as precise in terms of the black key widths and the gaps between them (although I could be wrong). These dimensions do matter, but bear in mind tjat they do also slightly differ from one manufacturer to the next. For these models I obtained the precise black key widths and gap measurements from David Steinbuhler, one of the leading manufacturers of narrow keyboards, and the founder of the D.S. standard. I have prioritised accuracy in terms of the gaps between the black keys. For the specific positions of the black keys relative to the white keys I have used images of narrow keyboards and have aimed to position them as close as possible to where they would be in reality.
This is a fairly straightforward build that anyone with a bit of DIY experience and some simple tools could handle, but it does require a degree of precision in the measurements and the placement of the black keys, so you will need patience, a steady hand and good lighting. If you run into any problems or if you have any suggestions, feel free to drop me a line. I would love to hear from you.
Tools & materials
Tools:
-
Fine-tooth saw
-
Tape measure
-
Ruler and / or tailor's sewing tape
-
Combination square / try square
-
Clamp (e.g. a G-clamp or similar)
-
Sandpaper (around 60 or 80 grit, plus a fine sandpaper around 120-grit)
-
1-inch paintbrush
-
Short flat, or small round, artists acrylic paintbrush
-
Sharpened pencil
Fixings:
-
Wood glue (don't skimp on this. Go for a good, strong adhesive - you don't want your black keys to fall off!)
Materials:
For the white key base; smooth planed timber (e.g. pine / spruce)
-
Thickness; 18mm (I would recommend at least 10mm as a minimum, but 18 - 20mm is better. This measurement does not have to be precise, but you don't want it to be too small as this is the depth of the key)
-
Width; at least 150mm+
-
Length; at least 650mm+ (This will be enough to make 2 dummy keyboards; a 5.5-inch octave, and a 6-inch octave).
Check to see that the timber is straight, with no warping or twisting, and no black knots in the wood that could fall out later on.
For the black keys; smooth planed stripwood (e.g. pine)
-
Thickness / width; at least 10 X 10mm (it can be thicker than this, but will need trimming to size)
-
Length; at least 2.2 metres (accounting for around 10% wastage).
FInishes:
-
Wood primer / undercoat
-
Knotting solution (optional)
-
Black acrylic paint
-
White acrylic paint
-
Black fine liner pen (for drawing on the key positions. I used a Sakura Pigma Micron pen with a 0.5 nib)
-
Clear varnish (optional)
Instructions
STEP 1 - cut the wood for the white key base
Cut two lengths of the wood that will be used for the white key base as follows:
-
Cut one length to 280mm for the 5.5-inch octave keyboard (nearly 2-octaves total)
-
Cut another length to 305mm for the 6.0-inch keyboard (nearly 2-octaves total)
These dimensions were calculated as follows; a 5-inch octave works out to 139.7mm. For 2 octaves this comes to 279.4mm, rounded up to 280mm. A 6-inch octave keyboard is the equivalent of 152.4mm (2 octaves = 305mm). Bear in mind that the 2-octave measurement is indeed 2-octaves in terms of size (as measured from the left-hand side of the C to the right hand side of the B), however it's just not 2-octaves in terms of how we think of this as an interval from C (i.e. ending on a C, rather than a B).
If you're not very familiar with cutting wood, here are a few simple guidelines;
-
Use a tape measure to measure out the correct length and place a mark on the wood with a pencil.
-
Using this initial mark, draw a straight line across the width of the wood using a combination square / try square. This will give you a nice, straight, sawing guideline.
-
Clamp the wood to a work surface and cut with a fine-tooth hand saw.
-
Always cut with a bias towards the 'waste' side of the cutting line (i.e. the side of the wood that is being removed).
-
Don't rush. Let the saw do the work, with long strokes backwards and forwards using most of the blade length.
-
Reduce splitting on the underside by lowering the angle of the saw to around 25 - 30 degrees. Increase the pressure as the handle nears the wood
-
Support the overhang of wood, otherwise the weight of the wood could cause it to snap off and split before you finish the cut. You can support it with your free hand if the overhanging wood is fairly small, or with a larger support, such as another work bench. The longer / larger the overhainging wood, the more support it will need.
-
When starting off the cut, shorter strokes work better. Use the non-sawing hand to help guide the saw for the first few cuts, but be very careful with your fingers! Children; do not attempt this build without the help of an adult at all times.
Once the timber is cut to the correct length, you will need to saw the widths of each piece down to 149mm. This dimension is the same for both sizes of keyboard.
White key base dimensions (5.5-inch octave keyboard):

White key base dimensions (6-inch octave keyboard):

STEP 2 - cut the wood for the black keys
Cut the smaller stripwood to lengths of 98mm. You will need 20 of these in total for two dummy keyboards.
STEP 3 - trim the black keys
For the black key height (i.e. the height above the white keys):
The next step is to sand the stripwood to the correct thickness to make the black keys. The height of the black keys above the white keys is around 10 / 11mm so if your stripwood is around this size in one of the dimensions, then leave it as it is. If the measurement is a few mm off, it will need sanding down. I have found that the best way to achieve the correct thickness is to sand to size by holding the wood in one hand and rubbing in a circular motion against 60-grit sand paper on a flat work surface. Keep the sand paper held firm against the table top with the other hand. Monitor the thickness as you go to avoid taking off too much.
For the black key width:
The black key width is slightly different for the 5.5-inch octave than for the 6.0-inch, as you would expect in keeping all things proportional. I obtained the following dimensions from David Steibuhler:
5.5-inch octave keyboard: 8.1 mm (8mm is fine)
6.0-inch octave keyboard: 8.8 mm (a fraction under 9mm is fine)
For this project, the figures in brackets above will work just fine. Remember that one of the dimensions should be around 10 or 11mm (for the black key height) so decide first which side is which so you don't get confused. You could write the word 'top' on the top edge of the stripwood before you start (see below).
Do this for all 20 strips of wood; 10 black keys sanded to 8mm and 10 black keys sanded to just under 9mm.
Black key dimensions (5.5-inch octave keyboard):

Black key dimensions (6-inch octave keyboard):

STEP 4 - shape the black keys
Shape the front ends of the black keys. This is an important step if you want your keyboard to look and feel like a real piano keyboard, albeit a silent one. Measure 8mm across the top edge (from either end of the stripwood, it doesn't matter which) and place a mark. Continue the line across the width of the top edge, and down each side a little using a combination square / try square.
Lay the stripwood down so that the side profile is facing up. Using a ruler, draw a line connecting the bottom corner of the stripwood to the point on the top edge where the pencil mark meets the edge. Do this for all the lengths of stripwood.

WIth the strip wood marked up, secure one of the pieces to a work bench with a clamp and cut the profile shape with a fine-tooth saw. Do this for each length of stripwood. Bear in mind it can be a fiddly task trying to clamp down such a small piece of wood! At this stage I chose to sand down the top corners of the profiled edge a little to give the black keys more of a rounded look,
STEP 5 - prime the wood
Now it's time to prime and paint the wood. Sand all the strip wood and the planed timber for the white key base with 80 grit sandpaper. Optional; if there are obvious knots in the wood you may want to apply knotting solution to them first to seal the knots. Wipe of the dust, then prime the wood with a white, water-based wood primer / undercoat. The first coat will be fairly transparent. Inbetween coats, sand lightly with a fine sandpaper (e.g. 120 grit) to de-nib the raised grain. Three or four coats should suffice, depending on the depth of white you want to achieve. You will be painting the black keys black, so two coats of undercoat is fine for the stripwood.
STEP 6 - mark up the base
Use a sharp pencil and a ruler to mark up the white key base with the key positions. This part of the process will probably take the longest as it requires some precision. It is worthwhile taking your time to get it right. Cue lots of detailed drawings and explanations.....are you ready?
For the 5.5-inch keyboard:
The white key widths were calculated as follows; a 5-inch octave works out to 139.7mm. This figure, divided by 7 keys = 19.95mm, so I have taken the liberty of rounding this up to 20mm. The schematic below shows the terms I will be using for each side / edge of the keyboard base to avoid any confusion.

5 (A). With a sharp pencil, begin by placing marks at 20mm intervals measured from either the left, or right side of the white key base (it doesn't matter which). Do this twice; one set of marks near the front edge, and the other closer to the back edge as shown below. N.B. only half the width (i.e. 7 white keys) of the dummy keyboard is shown below, and in all the illustrations that follow. I have done this for the sake of clarity so that the measurements are easier to see on the screen.

Now join up the marks with a ruler*. These are the white key dividing lines. For ease of reference I have labelled each of these dividing lines with the relevant black key sharp that sits on the line in question.You will end up with 13 dividing lines in total for 2 octaves.
*Alternatively, if your combination square / try square is long enough you can use this instead and you will avoid having to mark out 2 sets of measurements (as long as your try square is accurate!). Here are the lines joined up:

5 (B). Measure 49mm from the front edge and place a mark. Do this at several points across the width of the base (it doesn't matter exactly where, just space them out a little).

Join up the lines with a ruler. For reference, let's call this line the front line.

Measure 2mm from the front line and place a mark as shown below. Do this at several points across the width of the base as before and join up the lines. I have labeled this the black key line.
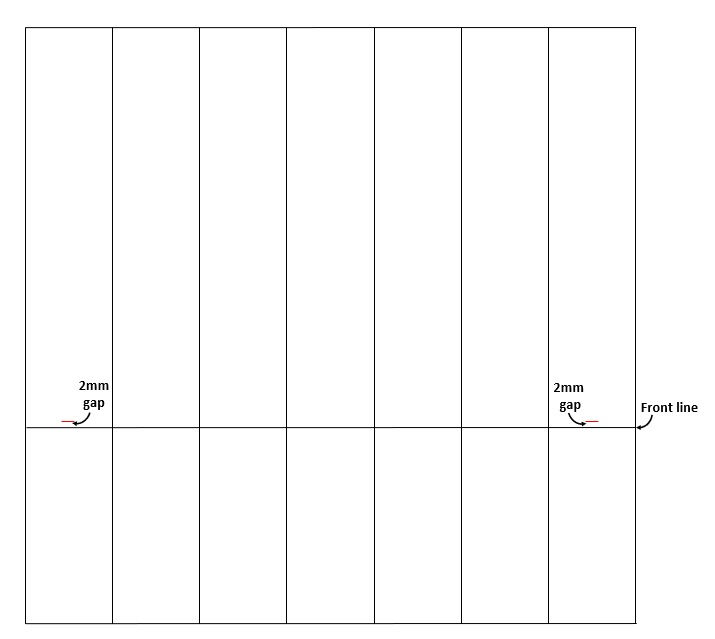

5 (C). Measure out 2mm to the right of the C-sharp dividing line and place two pencil marks, one towards the back edge, and the other further to the front. Join up the marks with a ruler, stopping when you reach the black key line. Alternatively, just place one mark and then use a combination square / try square.


Now measure out 6mm to the left of the same C-sharp dividing line. Place two pencil marks as before and then join up with a ruler, stopping when you reach the black key line. You should now have one line to either side of the C-sharp dividing line. These lines mark the left- and right-hand edges of the C-sharp black key position, so let's call these lines the edge lines.

Repeat this procedure for the D-sharp dividing line, only this time measure 2mm to the left of the line and 6mm to the right of the same line. These lines mark out the D-sharp key position.

5 (D). Mark on the edge lines for the G-sharp key by measuring out 4mm to the left, and 4mm to the right of the G-sharp dividing line. Place two marks on each side and join with a ruler, or use a try square.


5 (E). Measure out 14.5mm to the left, and 14.5mm to the right of the two G-sharp edge lines you placed in the previous step. Place two marks with a pencil and join up the lines.

The first line (line A in the schematic below) marks the right-hand edge of the F-sharp key. The second line (line B) marks the left-hand edge of the A-sharp key.

5 (F). Measure out 8mm to the left of the F-sharp edge line (A) and make two more marks, joining them up. Now measure out 8mm to the right of the A-sharp edge line (B) and make another two marks, joining them up.


5 (G). Repeat steps 1 - 6 for the second octave (but maybe take a coffee break first!). You can now erase some of the pencil lines. For now, erase only the white key dividing lines that fall inbetween the black key edge lines. Do not erase the dividing lines beyond the front line, or those between the white notes E - F and B - C.

5 (H). If you examine a real piano keyboard you will see that there is a gap between the black key edge and the white keys. These extra gap lines are not absolutely necessary, but I have included them here to help make your keyboard look more like the real thing. It also allows a little extra wiggle room in case the black keys are glued on in slightly different positions. You have already marked in the first gap line at the front edge of the black keys, since this line is the same as the front line. To add the remaining lines simply measure out 2mm to the left and right of each black key edge line, place two marks and join up, this time stopping when you reach the front line.

5 (I). Use a combination square / try square to carry the division line of each white key down the front edge of the keyboard. Once you are happy with the pencil guidelines, go over all the lines with a fine liner pen (I used a Sakura Pigma Micron, 05 nib). You can erase any parts of the front line and black key line that you don't need. Be careful, however, to leave these two lines where they are used to represent the front edge of the black keys. If you have made it this far, well done! Your white-key base should now look like the following image (bear in mind only half the dummy keyboard width is shown for reference).

For the 6.0-inch keyboard:
For the 6-inch keyboard instructions I have dispensed with the diagrams, since the process is the same, only with differences in the measurements. This is more of a summary, so if you are unsure, simply return to the 5.5-inch instructions, but substitute the measurements in the diagrams for those shown below. For the 6-inch model some of the measurements are fractions of a millimetre, but you can always eyeball it. You will have to decide how accurate you wish to be. The white key widths were calculated as follows; a 6-inch octave works out to 152.4mm. This figure, divided by 7 keys = 21.8mm, but you can round this up to 22mm, or a fraction under.
5 (A). Mark on the white key dividing lines at 21.8mm intervals (or just under 22mm is fine. You could get away with 22mm, but the end result would be a fractionally larger octave and fractionally displaced black keys...it really depends on how fussy you are!)
5 (B). Mark on the front line position, 49mm from the front edge of the white key base, then mark on the black key line by measuring 2mm from the front line.
5 (C). Mark out the edge lines for the C-sharp key. Measure out 2.5mm to the right of the the C-sharp dividing line. Measure out 6.5mm to the left of the same line. Repeat for the D-sharp dividing line (2.5mm to the left of the line and 6.5mm to the right of the same line).
5 (D). Measure out 4.5mm to the left, and 4.5mm to the right of the G-sharp dividing line. Place two marks on each side and join together.
5 (E). Measure out 15.7mm (or just under 16mm) to the left, and the same amount to the right, of the two G-sharp edge lines you placed in the previous step. Place two marks with a pencil and join up. The first line (line A) marks the right-hand edge line of the F-sharp key. The second line (line B) marks the left-hand edge line of the A-sharp key.
5 (F). Measure out 8.8mm (or just under 9mm) to the left of the F-sharp edge line (A) and make two more marks, joining with a ruler. Now measure out 8.8mm (or just under 9mm) to the right of the A-sharp edge line (B) and make another two marks, joining them up.
5 (G). Repeat steps 1 - 6 for the second octave. Erase the white key dividing lines that fall inbetween the black key edge lines.
5 (H). Mark on the gap lines. Measure out 2mm to the left and right of each edge line. Erase any parts of the front line and black key line that you don't need.
5 (I). Use a combination square / try square to carry the line of each key down the front edge of the keyboard. Go over all the lines with the fine liner pen.
STEP 7 - attach the black keys
This is the fun part! This is also the key part to get right (no pun intended!) if you want to achieve a realistic feel for the spaces between the black keys - this can be a make or break situation for a lot of people trying these keyboards for the first time.
For the 5.5-inch keyboard:
In theory, since you have already measured everything out, you should be able to simply glue all the black keys in place without further adjustments. In practice, however, given small discrepancies in the measurements or the stripwood dimensions, you will now need to carefully measure the space between the black keys after you set them in position, fine-tuning the positions before the glue sets.
Take one of the pieces of stripwood and place it in the C-sharp space so that the edges of the key lines up with the edge lines you marked out earlier. The front, profiled edge should line up with the black key line. Don't apply any glue to it yet so that you can have a trial run before you commit to fixing it in place. Take another piece of stripwood and place it in position for the D-sharp, lining up the edges in the same way.
With the two black keys in position, place a ruler or sewing tape (pulled tightly) on top of them and measure the distance between the inner edges of each black key. Be careful to hold the black keys steady and to keep them aligned.
According to David Steinbuhler the space between the black keys should be as follows for the 5.5 inch octave keyboard:
-
5.5-inch keyboard; space between C-sharp and D-sharp = 15.4mm (or 15.5mm is fine)
Adjust the position of the keys until the space between the inner edges measures 15.5mm. After fine tuning the placement you may find that the black keys are now slightly mis-aligned to the edge lines you marked in earlier, but that's okay. The extra space provided by the gap lines gives you some wiggle room, and in any case the most important distance to get right is the distance between the black keys.
This was a trial run...now apply some glue and do it again for real this time. Go for a strong wood adhesive as you don't want your black keys to fall off later on, especially after all this effort. Adjust the position as you go until the spacing is correct, but act quickly before the glue sets. Be sure to measure at two or three points across the length of the keys. Once you are happy with the alignment, press down and hold it firmly in place for about a minute or two until the glue starts to set.
.png)
Take another length of strip wood and apply glue to the bottom. Place it in the G-sharp space, lining up the edges as before. You are basically centring the key on the dividing line between the two white keys G and A. When you are happy, hold it still and press down for about a minute until the glue begins to set. Ideally you would clamp this in position and leave it for much longer, but if your adhesive is of good quality this shouldn't be a problem.
With the G-sharp key glued in position, take another 2 pieces of stripwood and place one in the F-sharp space, and another in the A-sharp space. Don't apply any glue yet. Place a ruler or sewing tape (pulled tightly) across the top of the keys and measure the distance between the inner edges of F-sharp - G-sharp, and G-sharp to A-sharp. Here is the gap measurement:
-
5.5-inch keyboard; space between F-sharp and G-sharp (or G-sharp and A-sharp) = 14.5mm
Now apply glue and position as before, adjusting as you go. Once you are happy with the alignment, press down and hold for a minute or two until the glue starts to set.
For the 6.0-inch keyboard
For the smaller dummy keyboard the process is the same, but the space between the black keys are different, as follows:
-
6.0-inch keyboard; space between C-sharp and D-sharp = 16.7mm (just under 17mm is fine)
-
6.0-inch keyboard; space between F-sharp and G-sharp = 15.7mm (just under 16mm is fine)
STEP 8 - paint the keys with the top coat
Check to make sure that all the black keys are securely in place. Using black acrylic paint and a short flat, or small round artists brush, paint the black keys and the space surrounding them (i.e. the space between the edge of the black keys and the gap line). You could always use a black felt-tip pen if it is easier (Faber-Castell Pitt black (B) pens are great), or a combination of both as I did. The white keys will of course already be white, but if you want to add a top coat of white acrylic this will make the finish more opaque and durable.
STEP 9 - varnish
For the final step you may wish to protect the keyboard with clear varnish. This will make it easier to clean later on and will help to avoid smudging. Wait until the acrylic paint and pen has dried, then brush it on with the flat artists acrylic brush. It helps to write the size of the octave on the back of the keyboard for quick reference (do this before you varnish).
There you have it! Your very own set of 3-dimensional, dummy narrow keyboards. I hope it all goes well for you! Let me know how you get on! If you have any feedback or suggestions please do get in touch. I would love to hear from you!
